Making homemade soap bars is a fun and easy project that can be completed in just a few hours. Not only will you save money by making your soap, but you will also know exactly what ingredients are in the product. This blog post will discuss the ingredients and supplies needed to make homemade soap bars and the steps involved in the process. We will also provide a recipe for an easy beginner bar soap. Soapmaking can seem intimidating at first, but with this simple recipe, you will be able to create your homemade soap bars in no time!
Homemade Soap Bars
Homemade soap bars are made of natural ingredients and are a great alternative to storebought soap. Not only are they more affordable, but handmade soap bars also often contain fewer chemicals than commercial soaps. That's what makes handmade soaps more of natural soap.
Internet is full of homemade soap recipes. You can experiment with ingredients and methods to find what works best for you. For artisanal homemade soap making, you will need a few ingredients such as essential oil, lye, water, and some soap mold. But first, we need an easy and safe recipe for beginners.
Searching For Homemade Soap Bars Recipe
When you go shopping for soap bars, you will see a lot of ingredients that you can't pronounce. These chemical additives make the soap more durable, lather better, or last longer on the shelf. That's why these soaps are also called chemical soaps. These chemicals are not good for our skin. So homemade soap bars are a great way to avoid these harsh chemicals and better care of your skin.
When looking for a homemade soap recipe, it is important to consider the ingredients used. Some of the most common ingredients in homemade soap bars are lye, water, different kinds of oil, and essential oils. For different types of soaps, you need different ingredients. For example, an oatmeal soap needs oatmeal, while a soap with lavender needs lavender oil.
In addition, you can add different butter, such as shea butter or coconut butter. Homemade soap making gives you the freedom to choose a ready-made soap base, or you can make a soap base from scratch. You have a long list of options to choose from while making homemade soap.
Soapmaking is an art, and you can be creative with the ingredients you choose to use. Soapmaking is also a great way to use up ingredients that you have on hand. If you want a truly natural homemade soap bar, avoid the additives present in storebought soaps and stick to simple recipes with ingredients that you recognize.
Methods of Making Homemade Soap Bars
Homemade soap bars can be made in various ways, each with benefits and drawbacks. The four most common methods are melt and pour soap, cold process soap, hot process soap, and rebatching soap.
Melt and pour soap is the easiest way to make homemade soap bars. This method involves melting a pre-made soap base and adding essential oils and other ingredients. After melting the soap mixture, pour it into a mold, allow it to cool, and harden.
Cold process soap combines lye and water, adding oils and other ingredients. This method requires a little more work than melt and pour soap, but the end result is a bar of soap closer to homemade soap bars in terms of ingredients.
Hot process or hot pressed soap is made by cooking the lye and oil mixture until it thickens. This method is a little more dangerous than the other methods, as it involves working with lye and cooking soap for long hours. However, hot process soap results in a harder bar of soap that lasts longer.
Rebatching soap is a method for recycling old or unused homemade soap bars. This method does not result in a new soap bar, but it can remix ingredients or add new scents to old soap bars.
You can choose the method that works best for you.
Which Essential Oils To Add in Homemade Soap Bars

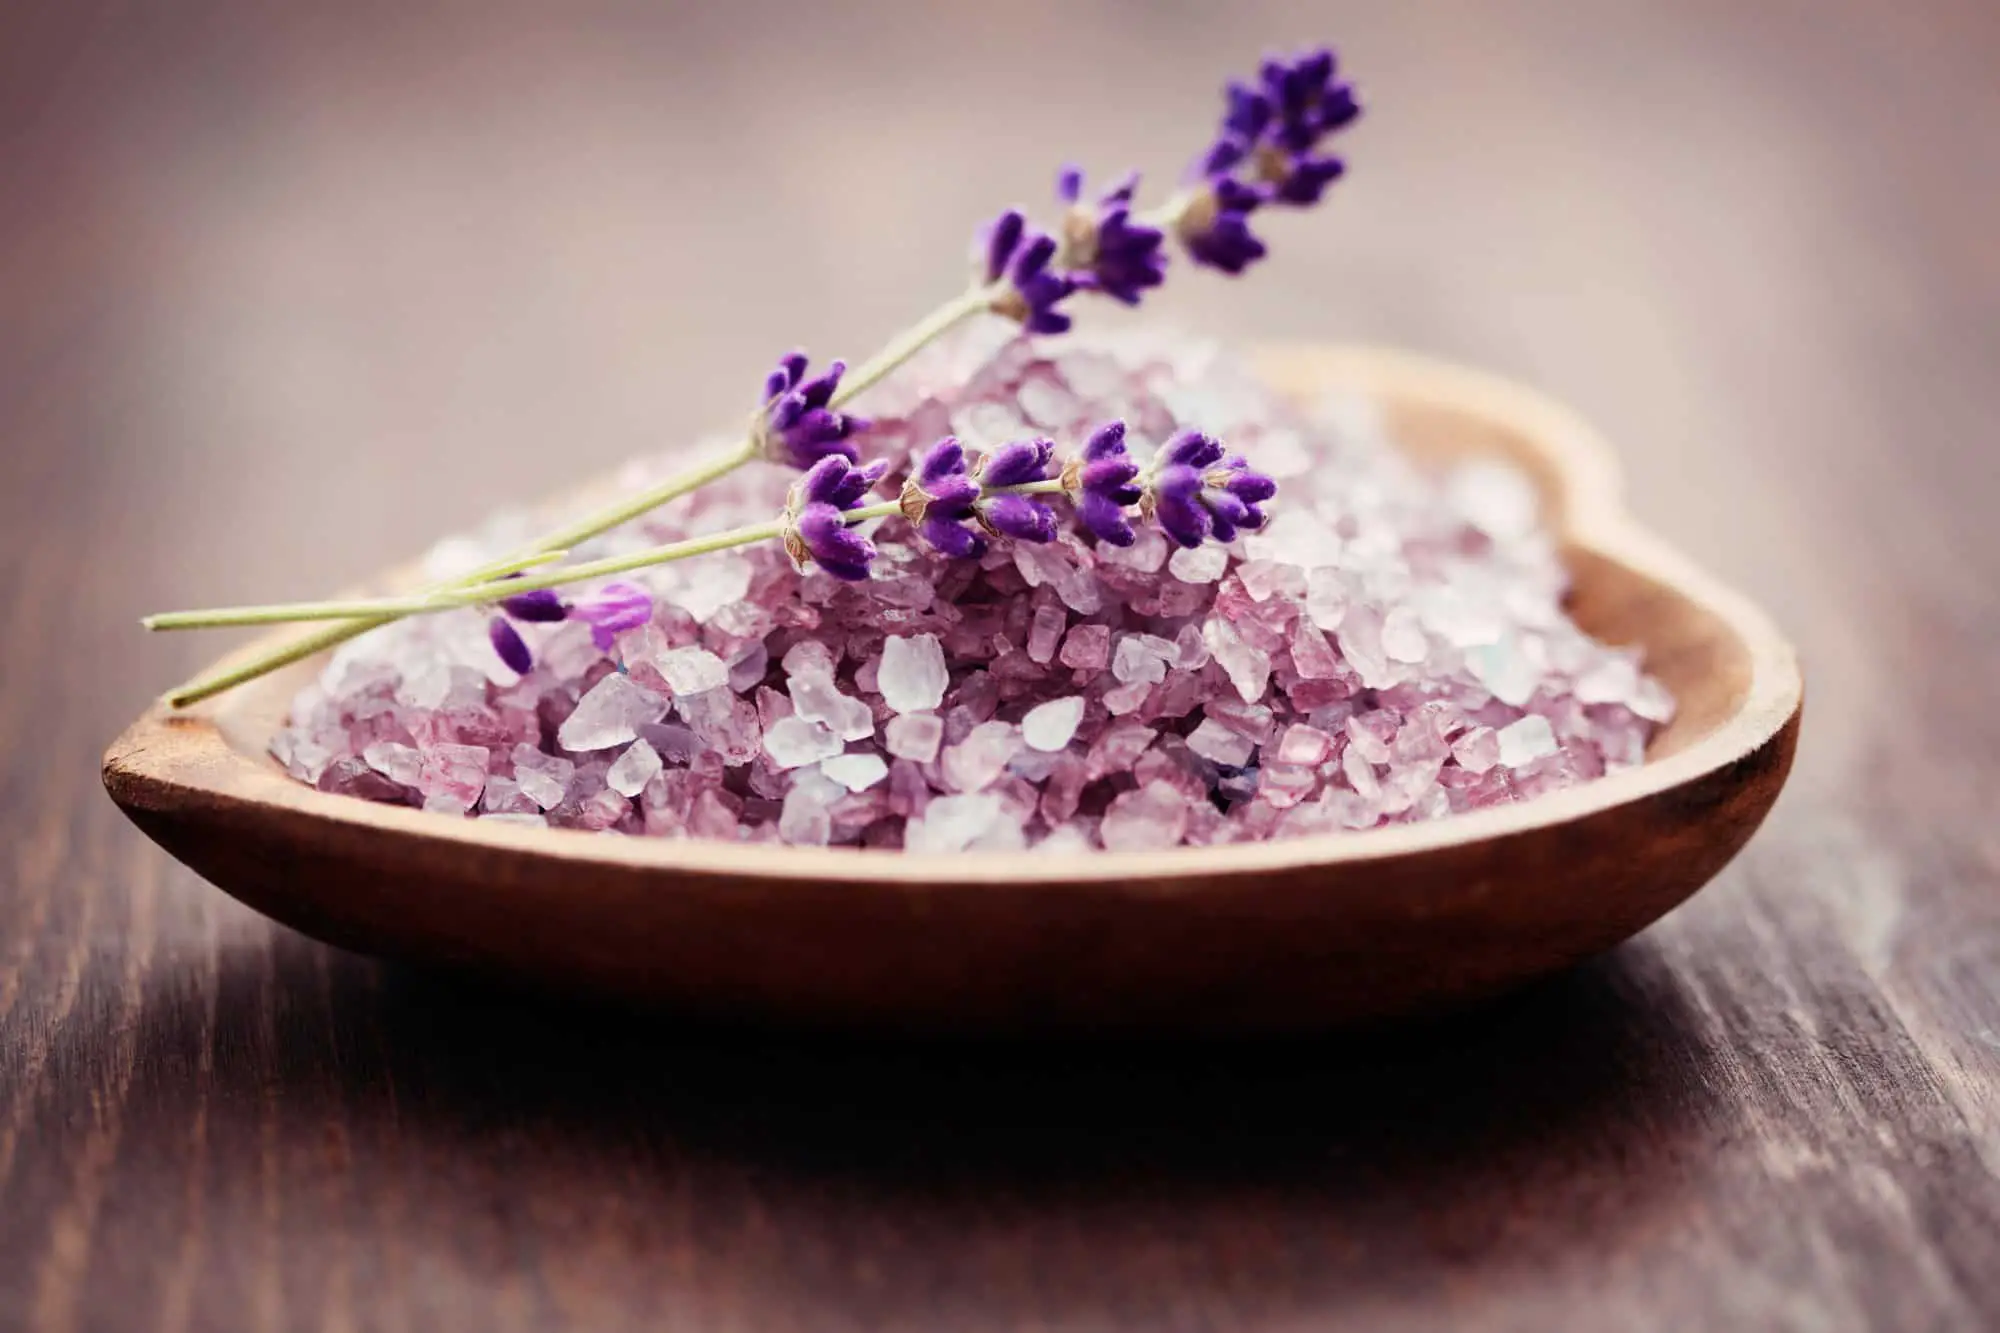
When making homemade soap, you can add essential oils for fragrance and other therapeutic benefits. The most popular essential oils for homemade soap bars are lavender, lemon, peppermint, and tea tree oil. These essential oils have a variety of benefits that include reducing stress, fighting bacteria, and boosting energy.
You can also add other ingredients such as oatmeal, poppy seeds, or lavender buds to your soap for added texture and fragrance. It is also essential to use essential oil specially made for soap making. Do not use essential oils that are meant for aromatherapy or other purposes.
Perfect Timing To Add Essential Oil in Homemade Soap Bars
When adding essential oils to your homemade soap bars, it is important to add them at the right time. Adding essential oil too early will not be as potent in the finished soap. If you add them too late, the essential oil's fragrance may fade away or be overpowered by other smells.
The best time to add essential oils is when the soap has thickened and is no longer in liquid form. This usually occurs after the soap has been cooking for 30 to 45 minutes while making hot process soap. On the contrary, cold process soap making adds essential oil when the soap is liquid. This will ensure that the oils are evenly mixed in with the soap bars, and you won't end up with clumps of essential oil in your final product.
Using Lye In Soapmaking
Lye is a strong alkali that is made from sodium hydroxide. It is an essential ingredient in homemade soap bars and is responsible for saponification – transforming oils into soap. Usually, lye comes in crystal form and must be handled with caution. It is important always to use lye in a well-ventilated area and wear gloves and goggles when working with it.
Lye or caustic soda is a dangerous substance and should be handled responsibly. It can cause serious burns if it comes into touch with the skin, so it is important to take precautions when working with lye. People with sensitive skin must take extra care while working with lye.
When using lye in soapmaking, always follow the recipe closely and take all necessary safety precautions. Lye should never be used without a recipe because the wrong proportion of lye can harden the homemade soap bars and make them unusable.
How To Avoid Lye While Making Homemade Soap Bars
Lye is dangerous and can cause severe burns if it comes into contact with skin, so many people avoid using lye in homemade soap. You can make soap without lye in different ways. Each method has its benefits and drawbacks.
The easiest way to make homemade soap bars without lye is by using melt and pour soap. This method involves melting pre-made soap blocks and adding fragrances, colors, and other ingredients. Melt and pour soap is a good option for beginners because it is easy to use and does not require special skills or equipment.
Rebatching:
Another way to make soap without lye is by using the rebatching method. This involves melting old or unused homemade soap bars and remixing the ingredients. Rebatching is a good option for people who recycle old soap bars or add new scents to their soaps.
Pre-made soap base:
Another option for making soap without lye is to use a pre-made soap base. You can use goat's milk soap base, glycerine soap base, cocoa butter soap base, or shea butter soap base. These bases are easy to use and do not require special skills or equipment.
Insulation Of Homemade Soap Bars
When making homemade soap, you will need to insulate it somehow. This is necessary to keep the soap from cooling too quickly and causing the formation of soda crystals. This is also a necessary step because covering doesn't let air to the soap will form a hard crust on the top.
In addition, When making homemade soap bars, it is important to wrap the soap to protect it from bacteria and other contaminants. You can use various materials to wrap your soap, such as wax paper, plastic wrap, or aluminum foil.
The type of wrapping material you choose will depend on the method of soapmaking you are using. For example, if you use the melt and pour method, you will need to wrap the soap in plastic wrap or aluminum foil.
The melt and pour soapmaking method requires more glycerine than the cold or hot process methods. To prevent glycerin dew, wrap melt and pour soap in plastic wrap as soon as it has completely cooled and solidified.
In making cold pressed soaps or hot-pressed soap, you can use wax paper or a towel to protect the soap from bacteria or other contaminants.
Size Of Mold

As a beginner, you can use food containers such as plastic bowls or silicone baking pans as your mold. These containers are easy to find and can be reused over and over again. But, if you really fall in love with soapmaking you may want to invest in a silicone loaf mold or some other type of specialized mold.
A huge variety of soap molds are available on the market. Most common are silicon, wooded, plastic or HDPE, PVC, and Acrylic Soap Molds. If you are just starting, I would recommend using a silicone mold. They are the easiest to use and clean and can be reused repeatedly.
When making homemade soap bars, you will need to select a mold that is the right size for your recipe. If the mold is too small, then the soap may not harden properly and could end up with deformities. On the other hand, if the mold is too large, you will be left with a lot of excess soap.
A standard size mold for homemade soap bars is between five to six pounds. This will give you enough soap to use and still have some leftovers later.
Here, you have learned about some of the most important aspects of homemade soap making. By following these tips, you will be able to create your own beautiful and fragrant bars of soap.
Remember, when making homemade soap, always follow the recipe closely and take all necessary safety precautions.
Homemade Soap Bars Making Step By Step
Now that you have all of the information necessary to make homemade soap, it's time to get started! Soapmaking is a fun and easy process that everyone can enjoy. You can make your soap at home with some simple tools and ingredients.
The following is a step-by-step guide on DIY soap:
Tools you will need:
- Safety goggles and gloves: It is important to protect your eyes and hands when making homemade soap.
- Digital Scale: This is necessary to measure the ingredients accurately.
- An oven thermometer: This will help you ensure that the soap is cooked at the correct temperature.
- Mixing Bowls: You will need several bowls to mix the ingredients.
- A stick blender: This is necessary to mix the soap ingredients thoroughly.
- Measuring Cups: You will need several measuring cups to measure the ingredients.
- Soap mold: You will need a mold to pour the soap into.
- plastic wrap: This is necessary to wrap the soap in after it has been poured into the mold.
- Aluminum foil: This can be used as an alternative to plastic wrap.
- Old towel or blanket: This is necessary to wrap the soap in if you are not using a mold.
- Sharp, thin knife: This is necessary to cut the soap into bars.
Ingredients you will need:
- Lye(sodium hydroxide), a two lb of lye, will make about four batches of soap.
- Distilled Water: This is used to dissolve the lye. Approximately 19 oz of distilled water is needed for this recipe.
- Coconut Oil: approximately 16 oz.
- Palm Oil:14 oz.
Optional ingredients:
- Fragrance oil or essential oil: Add up to two ounces of fragrance oil or essential oil per batch.
- Colorant: Add a few drops of soap colorant, if desired.
- Superfatting agent: Add up to two ounces of a superfatting agent, such as honey, shea butter, or almond oil.
Warning: Not only is lye a caustic chemical, but it can also cause severe burns. Never use the pots in cooking that have come into contact with soap making.
Safety Precaution while Making Homemade Soap Bars
When working with lye, always take precautions to protect yourself. Wear goggles and gloves to avoid contact with the lye. It is also important to mix the lye solution in a well-ventilated area. Lye fumes can be harmful if inhaled.
Keep children and pets away from the work area and ensure that all ingredients are stored in a safe place, out of their reach.
When adding fragrance or colorant to homemade soap, always mix them into the lye solution before adding the oils. This will help to prevent any adverse reactions.
If you're worried about dealing with lye, use a little extra fat rather than the precise amount canceled out by the saponification process to ensure none remains in your finished soap. This is referred to as "superfatting," It will almost certainly be mentioned in any soapmaking calculator, chart, or other resources you consult.
Homemade Soap Bars Step By Step:
1. Mix the Lye:
Working with lye requires extra precaution. So first, put on your safety goggles and gloves. Measure approximately 200 gm lye crystals in a container pot (do not use aluminum). Now weigh 19 oz distilled water and slowly pour the water into the lye crystals while stirring. Be careful as this will heat up quickly and produce fumes. So make sure you are working in a well-ventilated area. Be very careful when working with lye, as it can cause severe burns.
Stir the lye solution until the crystals have completely dissolved. The resulting liquid will be very hot, so allow it to cool for about 15 minutes before moving on to the next step.
2. Prepare the molds:
While the lye is cooling, prepare your soap molds. If you use a wooden mold or baking loaf pan, you will need to line it with parchment or wax paper. Cut a piece of wax paper that is large enough to fit the bottom and sides of the mold. Secure the wrap in place by placing an aluminum foil or another heavy object on top. Make sure that the wrapping extends up and over the sides of the mold.
If using a silicone mold, you do not need to line it with wax wrap. The saponification process will release the soap from the mold.
3. Melt and mix the oil:
Now it is time to melt the oils. Some oils, for example, coconut or palm oil, are solid at room temperature. So you will need to melt them in a pot over low heat before adding them to the lye solution.
Once the oils are melted, put your soap making pot on scale and weigh the pot. Now pour oil into the pot and tare the scale. This will give you the weight of just the oil.
After you have weighed your oils, it is time to add lye solution into the oil. At this stage, the oil temperature should be around 80-100 F. If the oil is too cool, the homemade soap bar will take a longer time to saponify, and you may end up with excess unreacted lye in your batch. So if needed, gently heat the oil until it reaches the desired temperature.
Pour the oils into a large bowl. Now slowly pour the lye solution over the top while stirring continuously. The mixture will start to thicken and become more difficult to stir.
4. Blend Soap Mixture:
Blender the oils and lye water using a stick blender until you reach a thick trace. This is where the soap starts to take on the consistency of pudding. Don't worry; if you don't have a stick blender, you can use a hand mixer. However, it will take longer to reach trace.
Trace is reached when the mixture drips off the beater in ribbons that take a few seconds to disappear back into the batter. Once you have reached trace, stop blending and stir well.
5. Add essential oil and colorant:
Now add the essential oil of your choice into liquid soap. We recommend between .25 and .50 ounces per pound of soap. Stir well to combine.
If you want to add colorant, now is the time to do so. Add a few drops at a time until you have reached the desired shade. Be careful not to add too much, as this can cause your soap to seize.
6. Pour soap into molds:
Now pour the soap mixture into your prepared molds. If using a wooden mold or baking loaf pan, make sure you tap the sides of the mold several times to help release any air bubbles. If using a silicone mold, no tapping is required. Be careful not to get the soap mixture on the wax paper, making removal difficult.
Now cover your mold with a piece of plastic wrap and secure it in place with an elastic band or clip. It will help keep the heat in and speed up the saponification process. Allow your soap to cure for at least four weeks before using.
7. Cut and cure soap bar:
This soapmaking method is called the cold process. After the soap has been poured into the molds, it can saponify or cure for several weeks. This is a slow process when the lye and oils are combined. The mixture will go through several stages before it is ready to use.
The final curing stage takes place after the soap has been cut and is left to dry for four weeks. The soap will continue to harden and become more stable during this time.
You will need a sharp knife and a cutting board for soap cutting into bars. Wet the soap slightly and then cut into bars about .75-.85 ounces each. Place them on a wire rack to dry.
It is important to allow your homemade soap bars to cure before using it fully. If not, it may cause skin irritation. Soap that has not been cured properly will also not last as long.
Easy Combination Recipe of Homemade Soap Bars Saves Money
From this recipe, you can make approximately ten bars of DIY soap. We recommend using this recipe as it is an easy combination that is difficult to mess up if you are just starting. Once you have made a few batches and become more comfortable with the process, you can experiment with different oils and recipes.
You can also change this recipe to create swirl designs or color layering. You can add a small amount of olive oil or another oil to the soap batter for swirls before pouring it into the mold. This will give you a more marbled look. To layer colors, wait until the soap has reached trace and add different colored oils to the mixture. Be sure to stir well to combine. Then pour the batter into your prepared mold.
This recipe is also great for handcrafted soap gifts. Just wrap them in some pretty tissue paper or a cellophane bag, and you have a lovely gift that anyone would love to receive!
So there you have it! An easy, beginner-friendly homemade soap bars recipe that is sure to leave your skin feeling soft and silky. You can make glycerine soap or Ivory soap with little changes and ingredients with this recipe. So why not give it a try? Your bathroom will thank you!