Maybe you remember the overly fragrant bar soaps your mother kept next to her sink. Now it's a return to natural essentials, even in soap making. You can craft homemade soaps with the same natural and skin nourishing ingredients. Homemade soap making is difficult, so you can easily apply the melt and pour method by following a simple recipe. You can color, scent, and shape a clear melted soap base as per your wish. Making melt and pour soaps is an inexpensive, fun, and easy way to get started making saps.
The melt and pour soaps recipe is best for beginners to wade into soap-making and spa crafting. Some soapmakers move on to cold process soap making from melt and pour soap making, but many are just fine with the safety and ease of melt and pour soap making. The melt and pour soaps are the finest gift for your loved ones, or you can use them at home.
How To Make Melt And Pour Soaps:
If you are a melt and pour soaps loving person and very excited to make homemade melt and pour soaps, the procedure is just given below. But before discussing the steps to make homemade melt and pour soaps, you should arrange all the essential elements for soap making.
Supplies Needed To Make Melt And Pour Soaps:
Below is the list of melt And pour soap-making supplies you need with a description. You can buy all melt and pour soap making supplies from nearby stores or online easily.
- Melt and pour Soap base
- Rubber stirring spoon or spatula
- Sharp knife or cutter
- Cutting board
- Microwave safe bowl
- Soap making pigment powder or dyes
- Liquid glycerin
- Soap fragrance oil or essential oils are used in soap making.
- A mold is used to make soaps.
- A spray bottle filled with pure isopropyl alcohol (rubbing alcohol)
Melt And Pour Soaps Bases:

There are many bases of melt and pour soap available. The best melt and pour soap will be the one that serves you the required result for which you are making soap.
Some of the melt and pour soap bases with a brief description are the following:
Glycerin Soap Base:
The glycerin soap base provides glycerin quality. These bases have very hydrating effects on the skin.
Aloe Vera Soap Base:
They have soothing effects for itchy skin types like acne-prone and eczema-related issues.
Cocoa Butter Soap Base:
As the name shows, cocoa butter has a nourishing and repairing ability. Especially targeted for dry and damaged skin.
Goat's Milk Soap Base:
It has goat's milk, rich in lactic acid, a mild exfoliant. It also evens out the complexion and works equally well for all skin types.
Olive Oil Soap Base:
It has a light, mild and pleasant formula, suitable for all age groups, especially babies. It has an improved lather, so better cleansing ability and nourishing and hydrated results.
Honey Soap Base:
Honey is naturally rich in antioxidants hence serves best for antiaging effects.
Tips for Making Melt And Pour Soaps:
- Use plastic bags to store your soap to keep it safe from sweating.
- You can combine two soap making bases by melting them together. Honey and milk bases are a popular combination.
- You should choose a soap color and scent close in hue and fragrance. Use coconut oil for white soap and lavender essential oil for purple soap.
- You can do experiments with different amounts of color and fragrances for different results.
- Four hundred fifty grams of soap will typically produce 8 to 10 large bars of soap.
- The final color of soap may be affected by tint in some soaps. Greenish tints are common in hemp based soaps. It will look brown if you add pink color to it.
- You may also spray the surface of the poured soap with rubbing alcohol to burst any bubbles that have risen to the top.
- Silicone cupcakes and baking molds can be used as soap molds. For making mini soaps, you can also use silicone ice cube trays.
Making Melt and Pour Soaps:
Making melt and pour soap is an easy way out if you plan to make a bar of handmade soap for children or adults. Contrary to the cold process, it only reshapes after adding desired additives; as it hardens, it is usable. In contrast, the cold process involves working with a complicated chemical process of combining lye and oils, followed by curing it for a certain period.
Purchase melt and pour soap base, available online or any arts and craft stores. You can buy any soap-like white or clear glycerin soap but if you want to treat yourself, try goat's milk, olive oil, or shea butter melt. Do not use any other bar which doesn't mention melt and pour. It will not melt, and you can end up in a mess.
Here's A Step By Step Guide To Making Melt And Pour Soaps:
Chop and Melt
Roughly chop the soap bar into approximately an inch pieces with a knife. Chopping up will help in evenly melting the soap bar in a short period.
Microwave the chopped-up soap in a microwave-resistant bowl, give it a good whisk every 30 seconds till you reach 100% liquid consistency, with no solid soap pieces.
If you don't want to microwave, then heat on a water bath using the following steps:
- Pour some water into a pan and set a glass bowl over it.
- Put soap chunks in a bowl and heat the pan.
- Water will indirectly heat the soap while stirring it until smooth lump-free consistency has been achieved.
- Overheating melt and pouring soap will result in a soap mix that will be very difficult to handle and shape as it affects the consistency and changes it into a hard tacky mix, changing both its smell and color. However, it is safe for skin better discarded as it can end up in a mess.
Allow It To Cool And Add Colorants
Now place the melted soap bowl onto the countertop and let it cool to 120°F (49°C). Note: avoid adding colorants and fragrances at higher temperatures as it can alter your finished product's final color and odor.
Add colorants or pigment powder to soap, sticking to ⅛ teaspoon per pound of soap; otherwise, your finished soap can stain your skin. First, mix them in a tsp of liquid glycerin for pigment powder, then add to soap base. For liquid dyes, 3-6 drops for 1 pound soap.
Colorants should be non-toxic and hypoallergenic so that they can be skin safe. Other colorants used for candle making etc., should never be used.

Scent Your Soap
Similar is applied when it comes to fragrance oil and essential oils. Use any one or combo depending on the type of odor you want to create.
If you are using a fragrance oil, it should be around 1tbsp per pound of soap. In the case of essential oil, use half tbsp per pound of soap.
Again don't use fragrance oil for candle making; use skin-friendly oils only.
Fragrance and essential oils can turn your transparent soap hazy and cloudy because these oils are slightly colored. They mix with soap and induce a ting or a haze to the whole soap.
Pour Into The Molds
Now dribble the soap melt it into molds. You can use a particular soap mold or silicone baking molds. Lastly, you can even pour them in plastic molds, but make sure you coat them nicely with petroleum jelly.
Once the mold is filled, tap them carefully on the countertop to get rid of trapped air bubbles. Spray isopropyl alcohol gently on the surface if bubbles appear.
Foam or bubbles appear on the back of soaps, usually when we incorporate air. This mistake happens when we are stick blending. Make sure you're using a blender with straight blades, and there is no air trapped under the blades while working.
Let the soap sit for a day to set it to room temperature completely. Remove the soap from molds. If you find it difficult to take them out, put them in the freezer, followed by rinsing the molds from the outer side with hot water.
Normally melt and pour soaps are ready to use after taking them out from molds, contrary to cold process soap, which requires curing a month. There is a chance that melts and pours soaps may require an hour for its edges to dry fully. So allow them to sit on a rack after removing them from molds.
Enhancing the Melt And Pour Soaps:

If you want to enhance your melt and pour soap, then you have to follow the below-given steps:
Give it Textures
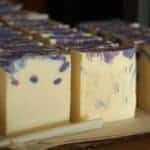
You can add textures using dried botanicals. Herbs (mint, lavender, and chamomile) and flowers (rose, hibiscus) are great sources. Make sure you add 6-12 grams per pound of soap.
Place them in the mold followed by pouring over your soap, or you can sprinkle them lightly over the soap right after pouring. Avoid using large petals to crush them for better texture; botanical soaps serve the best hands. They can be a bit rough for skin and body.
Spice Up Your Melt And Pour Soaps
You can also add in spices. Spices are a great way to introduce fragrance, color, and texture to your soap. They are readily available in every household. You'll be needing 1tbsp of spice per pound of soap. It is somewhat different for each spice. Just add it to melt and pour soap before pouring them into molds.
Cinnamon, pumpkin pie spice, and turmeric are nice options.
Add Butter For Moisturizing Effects
You can not go for cow's milk butter as it will spoil the soap. Take processed cocoa butter, shea butter or mango butter, etc. Add butter not exceeding 1-2tbsp per pound of soap; otherwise, soap will lose its hardness. Butters will improve lathering ability and heal dry, damaged, irritated, and sunburned skin.
Add Extracts To Your Soaps
You can also add extracts for enhancing properties. Extracts are different from essential oils and fragrance oil.
- Rose extract is anti-inflammatory reduces redness and irritation.
- Cinnamon extract is rich in antioxidants, reducing signs of aging.
- Green tea extract exfoliates and reduces blackheads.
- Tomato extract repairs and improves skin.
- You can add natural exfoliants like ground oatmeal, jojoba beads, cinnamon powder, sea salt, and sugars. They help in gently exfoliating the dead skin.
Stamp Your Soap

Stir it in right after you take the soap off the heat. Add 1to 2 tbsp per pound of soap. Adding a stamp to the base of your mold can really make a difference by personalizing it. Some soap molds have a designed base. You can also find rubber based soap stamps in the soap making supplies section. These stamps can be shaped like circles, hearts, or stars. They can even be some empowering words.
Make Fun DIY Soap by Adding Toys
You can add a small toy in clear soap bases like clear glycerin soap. This can be a great encouragement for kids to wash their hands properly. That small toy can be a small superhero character, a tiny plastic dinosaur, or a star. Make sure to use a clear soap base so that the toy can be easily shown through.
Make Swirled Patterns
Swirled soaps are popular these days. These soaps have a swirly pattern. All you need is to melt the soap and divide the soap into two parts, adding contrasting colors to each. Contrasting colors will really pop out the design.
The temperature and fluidity of melt soap should be considered; otherwise, you'll not be able to create a swirl pattern. Last but not least, gently stir the toothpick to create swirls; over-stirring can result in mixing the two colors of soap.
Why Not A Layered Soap?
You can also create layered soap. All you need is to melt a measured amount of soap required for one layer, add in color and rest of the additives of your choice, pour it in the mold, and wait till the top layer is cooled and firm enough that the second layer may not break it through on pouring. But before adding the second layer in the same way, spray a very thin layer of isopropyl alcohol.
To avoid getting melted and pour layers from separating, always spray just a little bit of isopropyl alcohol on top of the first layer. Be vigilant in the whole process as not to evaporate the alcohol. A little amount will bind the layers, but more will do the opposite.
FAQ related to Melt And Pour Soapmaking:
Hope this melt and pour soap making tutorial was helpful to you. I just wished I could convince you to Make melt and pour soaps. Following are some frequently asked questions related to melt And pour soap making. Please do not be shy to ask us if you have any additional questions other than the ones stated below!
Can you add glycerin to melt and pour soap?
Glycerin is a main constituent of melt and pours soap. But still, 1tsp per pound of glycerin can be added to it. Rendering soap with glycerin qualities. As glycerin is a humectant, it draws water from the atmosphere, leaving skin hydrated and moisturized. Vegetable oils can substitute glycerin in a bar of soap. Especially coconut oil, which imparts hardness to the bar and better lathering ability. You may use 1 tsp coconut oil for each pound of melt and pour soaps. This will have nourishing skin effects. But going beyond can soften the bar along with reduced lather.
How many bars of soap can be made per pound of melt and pour soap base?
The number of bar soap depends on the size of bars you intend to make. On average, you get 10-20 bars, ten large bars, or 20 small bars.
Can you add food colors to liquid hand soap?
Yes! You can add food coloring to liquid hand soap, as they are hypoallergenic, biodegradable, non-toxic, and easily available in every household. However, they should only be utilized with caution, in a small amount only as they tend to stain the skin, but their stains don't last long and wash away quite easily.
Do you need a preservative for melting and pouring soaps?
For melt and pour soap, you need to add preservatives if you add natural colorants, natural exfoliants, flower petals, extracts, honey, aloe vera gel. Natural additives need preservatives for melting and pouring soaps which is not the case in cold process soap as the cold process undergoes harsh pH change.
How do you prevent all the bubbles in your finished Melt And Pour soaps?
Bubbles appear when we incorporate air in our soap mix. So avoid any step that causes it. Tap the soap mix on the countertop before blending in additives to eliminate any trapped air. Better use a whisk than a stick blender where possible. Make sure your stick blender has straight blades. Still, you see bubbles on top, then spray with isopropyl alcohol. This will eliminate the bubbles.
How do you keep the soap fluid after heating while working with the design?
Once you start working with the design, make sure that maintaining the temperature is key. So, you have prepared everything. All your spatulas, bowls, other instruments are warmed up beforehand, additives and colorants are dissolved well with warm water.
In short, everything that soap is going to get in contact with should be warm. Make sure not to over blend the soap if you're using a stick blender, as blending results in a thick trace. Better use a whisk where possible. Try working at lower temperatures(100C or less) as the higher temperature mix tends to thicken early on. Lastly, adding curd to your soap also improves fluidity.
Can you make the same soap using melt and pour and cold process format?
Actually not. In the cold process, we are creating soap from a chemical process of saponification; there are more options of adding ingredients like fragrances, exfoliants, milk, etc. Working with melt and pour soap without getting them bad means warming up soap, reshaping it, and crafting it into the desired shape. There are fewer options for adding ingredients, especially raw ingredients like milk.
Can you add goat's milk to a glycerine melt and pour base?
You can add goat's milk to glycerine melt and pour soap only with a preservative. On the contrary, one can add goat's milk to a cold process soap without a preservative. The cold process involves extreme temperature rise due to the heat of saponification, and pH also changes drastically, killing any microbe that may exist.
What should you use to smooth, melt, and pour soap?
The smooth finish of melt and pour soap can be achieved by removing the surface layer. The surface layer can be washed away by rubbing the soap surface with isopropyl alcohol.
What to do if your melt and pour soap is rubbery?
If your melt and pour soap is rubbery, it will not allow you to smoothly add any colorant or additives. It will not be pourable in molds. However, it is skin safe but aesthetically unpleasant and with altered odor. Better to get rid of.
Why is your melt and pour soap sweating?
Melt and pour soaps usually show the phenomena of sweating; it is the appearance of water droplets on the surface. It is because of the glycerin added to melt and pour soaps. Glycerine is a humectant, and humectant is an agent that attracts water from the atmosphere. Glycerine serves the purpose of moisturizing skin. Sweating is more common in humid environments.